Showing posts with label die cutting. Show all posts

Tuesday, November 1, 2022

Hugs Card with Die Cut Divas

 Hello Crafty Friends - I am here with a encouragement card 
featuring Birch Press Design Dies.

and the Big Hugs Sugar Script Dies. I backed the simple yet intricate string frame with a mini heart pattern paper. Popped up the Sugar Script Hugs for som dimension and finished the card with 2 small cluster of flower sequins. 

Birch Press Design made this card come together really quickly and is perfect a friend who needs a little bit of love this week.


Birch Press Design has brightened the Die Cut Divas' with their sponsorship of our challenge blog.  

The Theme: Anything Goes Challenge  Prize: winner gets $20 gift card to the store.

I know everyone will want to go shopping at  Birch Press Design.

Our Divas are ready with some inspiration.


Wednesday, February 9, 2022

Love Heart Card with Fairy Stamper

Hello Crafty Friends - Annie here with a quick and easy love card
featuring Fairy Hugs stamp Vine Heart Frame.


Video Tutorial


Supplies Used:
Strathmore Bristol Smooth Cardstock
Recollections Brand 110# Cardstock: White
Recollections Brand 65# Cardstock: Light Pink
Recollections Brand 65# Shimmer Cardstock: Medium Pink
Crafters Square: Craft foam
Bearly Art Glue
L.A. Colors Tiny Heart Gem Stickers
Trinity Stamps Clear Gems

Fairy Stamper Video Design Team 
Annie Collins

Tuesday, November 17, 2020

So Thankful for You Card with Die Cut Dives

Hello Crafty Friends - I am here with a Thanks card in keeping with our theme this month.

Frantic Stamper is our Sponsor for the month of November.
The theme is Thanks or Thanksgiving.  
Are we ever happy and ready to post our inspiration projects.  We know everyone will be making cards this month and we hope you join our challenge.

PRIZE: FALL HARVEST DIE (over $25 US) 
Due to the high cost of shipping, only US residents are eligible.


Here's the card I created

Supplies Used:
Copic Markers: Acorns: E33, E35, E57
Leaves: B95, G05, R59, BV11,  & YR02
Sakura Gelly Roll Pen: Metallic Gold
Aspire Specialty Cardstock: Metallic Gold 
Accent Opaque White 80# cardstock: Ultra Smooth
Recollections Brand 110# Cardstock: White
Recollections Brand 65# Cardstock: Brown & Light Orange
Doodles Paper Playground Sequins
Art Glitter Glue
Crafter's Square: Low profile Foam Tape

Thank you for stopping by the blog today. I hope you found some inspiration!

Monday, November 9, 2020

Monday, November 2, 2020

Magic of Christmas with The Maker's Movement

Hello Crafty Friends - Annie here with a fun Christmas card featuring 


Video
https://youtu.be/TOaYGYLu30Q

Supplies Used: 
Recollections Brand 110# Cardstock: White 
Recollections Brand 65# Cardstock: Light Blue
Copic Markers: Both Yetis: C0, & C1
Lights: Y02, G07, R37, B93
Boy Yeti: B000, B0000, YG17 & G07
Girl Yeti: V000, R81, R37, & R59
Gifts: R37, R59, YG17, G07, B93, B95, Y00, & Y02
Mountains: B34 & B93 

Thank you for stopping by the blog today. I hope you found some inspiration!
 
Maker's Movement Designer 
Annie Collins 
IG: @anniec09

Tuesday, August 18, 2020

Thinking Of You Butterfly Card with In Love Arts

Hello Crafty Friends - I am here with a Butterfly Thinking of You card.

I was invited to create some projects by In Love Arts Shop
Yes, I did my research and this company only sells their own designs.
I am excited to share a few project with you in the following months.

Here is the card I created using the Pattern Butterfly Die.

Here's the Video Tutorial

Products Used from In Love Arts Shop:

Other Products Used:
Art Glitter Glue
Recollections Brand 110lb Cardstock: White
Recollections Brand 65lb Cardstock: Teal
Darice Brand :Embossing Folder
ColorBok Glitter Cardstock: Teal
Gold Shimmer Cardstock
Tsukineko: VersaMark Ink
Ranger Brand Embossing Powder: Detail Gold
MFT Brand: Fishtail Sentiment Strip
Sincere Sentiments Stamp Set

Thank you for stopping by the blog today. I hope you  found some inspiration!

Please stop by the In Love Arts Shop to see all the wonderful products they have in shop.

Thursday, March 19, 2020

Happy Birthday Card with Dies R Us

Hello Crafty Friends - I am here with a simple birthday card.

You can personalize the card by using the person's initials instead of the H and B for happy birthday,


I die cut all the components and trimmed some yellow cardstock for a card front panel. 

From the yellow cardstock, I die cut and H and B. I then adhered the yellow cardstock panel to the card base. Using some foam adhesive I replace the H and B back into the die-cut areas.
  

Next, I adhered the layers of the flowers together.
 

Then, I adhered the flowers, leaves, and sprig onto the card.

Next, I stamped the sentiment onto a white banner and adhered it to the card using some foam adhesive. I added a few gold sequins and some white gems to the center of the flowers for a nice finishing touch.
  

Now the card is complete!

Materials Used
Cheapo Dies - Font - Newsprint

Sue Wilson Designs - Finishing Touches - Faux Quilled Blooms

Sue Wilson Designs - Finishing Touches - Striped Nasturtiums

Lawn Fawn - Spring Sprig Dies

Lawn Fawn - Ahoy, Matey Stamps


Thank you for stopping by the blog today. I hope you found some inspiration!


Before I write the list of the supplies I used, I wanted to share some exciting news with you. Dies R Us now has a sister store called Didi Crafts, which has warehouses located in the USA and Canada. Didi Crafts carries some of the same products as Dies R Us, but most are different and you will be able to purchase a huge variety of crafty supplies for a variety of crafts. Having this sister store means that our Canadian crafting friends won't have to worry about huge taxes or shipping fees. Isn't that great?! Go take a peek and be pleasantly surprised!

Don't forget to come and join in the fun at the Dies R Us Challenge Blog. There's a new challenge theme offered on the 1st and 15th of each month and one lucky randomly drawn winner will receive a gift voucher prize to the Dies R Us Store. For your convenience, all the important Dies R Us links are provided below.


click below for:


Thursday, February 20, 2020

Mini Card and Envelope with the Maker's Movement

Hello Crafty Friends - I am here with a cute and easy mini-card with a matching envelope.

I am using products from the Maker's Movement the Special Delivery Die Set.

This die set creates the most adorable mini card and envelope. 
You can make them for any occasion. Just change your paper and cardstock.

I have a full tutorial video linked below.

YT Video

Materials Used:
Imagine Crafts Memento Dew Drop Ink: Rose Bud
Imagine Crafts Dew Drop Ink: London Fog
Imagine Crafts: Tear It Tape
Imagine Crafts: On Point Glue
G.C.D. Design: Cloisonne Pattern Paper
Recollections Brand 65lb Cardstock: Fushcia, Light Pink, Light Gray, White 
Bone Folder
Jewels: Elle Tru: Medium Pink, Light Pink, and White

Thank you for stopping by the blog today I hope you found some inspiration!

Monday, February 17, 2020

Happy Anniversary Card with Die Cut Divas

Hello Crafty Friends - I am here with a floral anniversary card
 featuring Hero Arts Stamps and Dies.


Our February theme is Hearts and Flowers and Hero Arts is our sponsor!


Gift Prize is a $24 gift certificate.

This is the card I created using a variety of Hero Arts Products.
Materials Used: 
Strathmore Bristol Smooth 100lb Cardstock
Recollection Brand 110lb Cardstock: White 
Accent Ultra Smooth 80lb Cardstock: True White 
Elle Tru: Jewels Pastel Pink, Pale Gold, and Opal
Imagine Crafts: Tear It Tape
Imagine Crafts: On Point Glue
Spectrum Noir Marker:
MG1, CG1, LG2, LG3, LY2, CT3
Sakura Gelly Roll Pen 05: Black and Gold Metallic

Thank you for stopping by the blog today. I hope you found some inspiration!
You can visit my blog for more cards and projects: Little Wings Creates

Don't forget to add your beautiful project to the challenge link below.

Sunday, August 25, 2019

Thank You for Being So Amazing Card - Vintage Rose Kit - White Rose Crafts LLC

Hello Crafty Friends - I am here with a  card using the New Release

The September Vintage Rose Kit is available for purchase now!

This gorgeous kit, with its rich color palette, is so evocative of the rose garden at the very end of summer... Deep, sultry reds and greens, with hints of pink and white. This bumper, jam-packed kit is a cardmaker's treasure trove!

TWENTY Double-Sided 6"x6" sheets Couture Creations "Vintage Rose" Collection papers
Kaisercraft 12" x 12" cardstock sticker sheet - "Romantique"
Tim Holtz Distress Oxide Ink Pad - Tattered Rose
Woodware Perfectly Clear Photopolymer Stamp Set - Sweet Sentiments
Ultimate Crafts Cutting Die - "Watercolor Bloom"
Bubble-pack of 4 Bronze-Colored Elegant Metal Roses from Enchanted UK
Selection of Dovecraft "In Bloom" Collection buttons
Pack of Kaisercraft soft pink floral adhesive rhinestones
Mid-Green Vine Style Leaf-Shaped Ribbon
Pack of Shaker Card Sparkles to coordinate with Kit colors
Selection of cards and envelopes from American Crafts, Kaisercraft and Jillibean Soup

Thank You for Being So Amazing Card

Let's Get started!

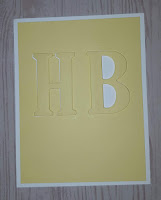
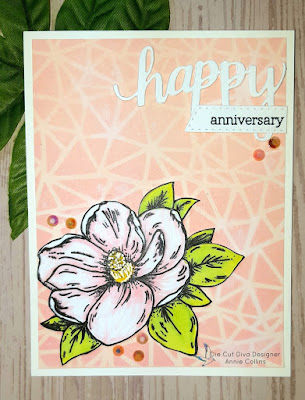
I start by gathering the components for the card. I trimmed the green gingham pattern paper to 3", the rose pattern to 1-1/4", I also trimmed a piece of Aspire Petallics Autumn Hay cardstock to 1". I die cut flowers from watercolor paper 5x, (I cut some of the leaves off for extra layering) and a card front panel from white cardstock. I pulled a few embellishments as well- washi, rhinestone flowers, puffy hearts and more (note - I didn't use all the embellishments I pulled - Yes, I am an overpuller 😉)

I used the Tim Holtz Distress Oxide Ink in Tattered Rose (from the Kit), Tim Holtz Distress Oxide Ink Worn Lipstick, Tim Holtz Distress Oxide Ink Bundled Sage & Tim Holtz Distress Oxide Ink Peeled Paint. I added a bit of water to the ink I smudged on my craft mat. I then used a paintbrush and colored the flowers and stems. On 2 of the flowers, I took out the little pieces, but on one of the flowers, I left all the pieces in - that is where I used the Worn Lipstick & Peeled paint to create some contrast and dimension. I set them aside to dry. 


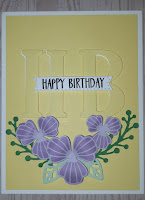
Next, I start to assemble the card. I adhered the green pattern paper first, then the rose pattern paper. Then, I put a strip of gold washi onto the Aspire Autumn Hay Petallics cardstock.  Next, I placed the Aspire Autumn Hay Petallics cardstock on top of the seam of the two pattern papers.
 

Then, I gathered the dried flowers and adhere them to the front of the card. I place the two flowers that I removed the bits from down first. I then add a bit of foam adhesive to the flower with all the bit in and place it on top of the other flowers. arranging them to the left of the card. I tucked the extra leaves in under the flowers.


Next, I decide on the rhinestone flowers (from the kit) and some puffy hearts for embellishments. I added 3 of the rhinestone flowers on the watercolored flowers. I then added 2 tiny puffy gold hearts by the flowers.


Finally, I adhered the sentiment (from the kit) using a bit of foam. I add a tiny gold puffy heart onto the sentiment.

That's it the card is complete. 

Materials Used:
Couture Creations "Vintage Rose" Collection papers:
Green Gingham Pattern paper and Rose Pattern Paper
Kaisercraft 12" x 12" cardstock sticker sheet - "Romantique"
Thank you for being so Amazing
Tim Holtz Distress Oxide Ink Pad - Tattered Rose
Ultimate Crafts Cutting Die - "Watercolor Bloom"
Pack of Kaisercraft soft pink floral adhesive rhinestones

Other:
Canson Watercolor paper
Recollections Brand Cardstock: Heavy Weight White 110lb
Recollections Brand Washi: Gold Petite Bloom
Recollections Brand: Tiny Puffy Hearts 

Thank you for stopping by the blog today - I hope you found some inspiration!


Be sure to tag us White Rose Crafts LLC on social media 
if you create a project with products or kits purchased on the 

Friday, August 23, 2019

Warm Winter Wish with Maker's Movement

Hello Crafty Friends - I am here with a video tutorial for the Maker's Movement.

I am honored to have the opportunity to create a few projects for the Maker's Movement and to try out the Die Cutting Machine the Crafter's Edge Crossover II. Along with a Stamp and Die Set and some other dies. 


The front of both cards.


Card # 1 - Warm Winter Wish -- Alpaca Your Bags


Card #2 -- Warm Winter Wishes


Inside of both cards


Here's the Video Tutorial


Materials Used for both cards:

MMT206 - 3.5" Round Awesome Acrylic Block Product Image


MSD202 - Alpaca Your Bags Stamp & Die Set Packaging

MOD220 - Pull and Reveal Circle Packaging

Xyron Mega Runner Adhesive
Tombow Multi-liquid Adhesive
Tsukeniko Memento Tuxedo Black Ink
Tsukeniko Versafine Onyx Black Ink
Tsukeniko VersaMagic Aegean Blue
Tim Holtz Distress Oxide Ink: Evergreen Bough
Sakura Gelly Roll Pens: Black, White & Sparkle
Neenah Solar White Cardstock
Recollections Brand Cardstock: Heavy Weight White, Light Blue, 
Green, Medium Blue
Martha Stewart Brand: Pattern Paper - Green Plaid

Thank you for stopping by the blog today, I hope you found some inspiration.